Tags
basement makeover, eclectic home, Embrace My Space, hanging curtains, Home Decor, ikat curtains, interior design, Moroccan Color Palette, swing-arm curtain rod
THE OTHER DAY in this Etsy Love post I showed you the little seating area in the back corner of the finished basement I’ve been working to upgrade (for more info on the progress of the basement makeover check out my posts here and here.)  I wanted to give you a little peek at some more progress that we’ve made down there. This past week it was all about adding the textiles. Because of some of the other projects that are still wrapping up (namely, the fireplace detail), I was forced into a corner – pun intended – for today’s photo feature. Here is a look at the corner now.
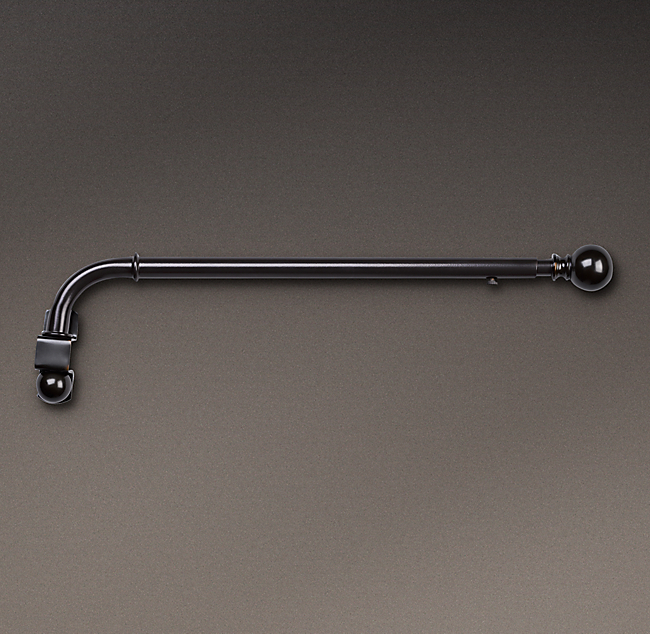
I think we all can agree that the corner warmed up about 100 degrees with the addition of two simple drapery panels. Because of the size and odd placement of the windows, we went with a swing-arm curtain rod to support each panel. This type of rod is ideal when you don’t have a lot of space for mounting traditional drapery hardware. Here is an example of a swing-arm rod.
Since the trim around these windows butts up against the ceiling we needed to go with a drapery rod small enough to snuggle right up to the ceiling. If you use a traditional curtain rod, the end brackets that secure to the wall are usually shaped in such a way so as not to allow you to put the rod flush to the ceiling. The swing-arm rod avoids this problem because it mounts at the side and below the top of the rod, allowing you to position the bracket so the rod is right up against the ceiling. 
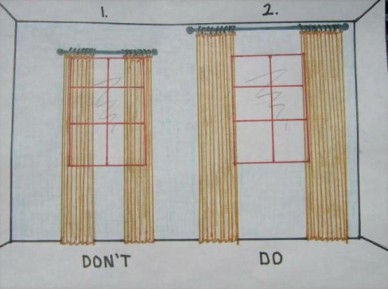
When you are working with a low ceiling, it is always a good idea to hang your drapery rods as high as possible in order to create the illusion of height. Also, when you are using window treatments as a purely decorative accent in your space (as opposed to using them for decorative and functional purposes), it is always best to cover as little of the window as possible with a drapery panel in order to create the illusion of a larger window. Exhibit A.

Photo via: Honey & Fitz
In addition, you can play with the placement of your drapery rods in order to balance out oddly placed windows. For example, our rods are affixed to the wall on the inside of each window and are hung the same distance from the corner. The purpose of this was to create the illusion that the windows are equidistant from the corner (even though they are not!). 
Let’s not forget to mention the lovely panels that made this whole look possible! They came from Kirtam Designs on none other than Etsy (you should have known!). Patricia, the owner of Kirtam Designs, makes everything by hand. We ordered a few swatches from her fabric shop to see how they’d look with the other materials we had selected for the space. We decided that this black, white and limey green ikat pattern would compliment our wrought iron details and Moroccan motifs nicely. Patricia whipped our panels up in just a few weeks. If you are in the market for something unique for your own space, check out Kirtam Designs for custom panels at a great price point! And, just in case you didn’t see this post, the recycled glass mason jar chandelier was handpainted by Etsy artist Vanessa, the owner of LITdecor.
Because our panels are lined and, thus, a bit heavy, I pounded a little finishing nail into the window trim at the center of the rod to help prop the rod up a little bit and to prevent the rods from swinging away from the windows on their own. I also gave the panels a good old-fashioned ironing (you know, like, on an ironing board) before hanging them. The result is beautifully crisp panels that pleat ever-so-naturally as they cascade into a tiny little pool at the floor.
And that is how you cozy up a corner!
xoxoSara


Absolutely love the fabric!!! Is the bar open yet??
not quite yet, mom! very soon though – we still need the plumber to get the water going to the bar sink!
I loooove the ikat! I just made a bunch of pillows with it and I am obsessed now!
I, too, am IN LOVE with ikat. I cant get enough of it!
I’ll be playing with my curtains in my bedroom tonight 😉
oooh, good luck with those! I always think hanging curtains will be an easy job and it always takes longer than it should!
Pingback: Its Curtains » Custom Curtain Company Fabric Swatch Side to Side